
Staff Management
The Staff page is where you manage everyone who works at your camp — counselors, nurses, kitchen staff, administrators, and more. You can add staff one at a time, import them in bulk from a spreadsheet, track personal information, assign staff to bunks, record salaries, and keep contact details organized.
Adding a Staff Member
Section titled “Adding a Staff Member”- Go to the Staff page from the sidebar.
- Click Add Staff in the top right.
- Fill in the staff member’s information. The form is organized into sections:
Personal Information
- First Name and Last Name (required)
- Full Legal Name — only needed if it differs from their first/last name (e.g., for payroll or official documents)
- Date of Birth — entered privately and hidden by default for privacy
- Profile Photo — upload a photo that appears in the staff table
Legal Identification
- Social Security Number and State ID — these are stored securely and hidden by default. They are never shown in the table or exports unless you specifically reveal them.
Contact Information
- Email and Phone — the staff member’s direct contact
- Home Phone, Father’s Phone/Email, Mother’s Phone/Email — additional family contacts, useful for younger staff members
Address
- Full address fields including street, city, state, zip code, and country
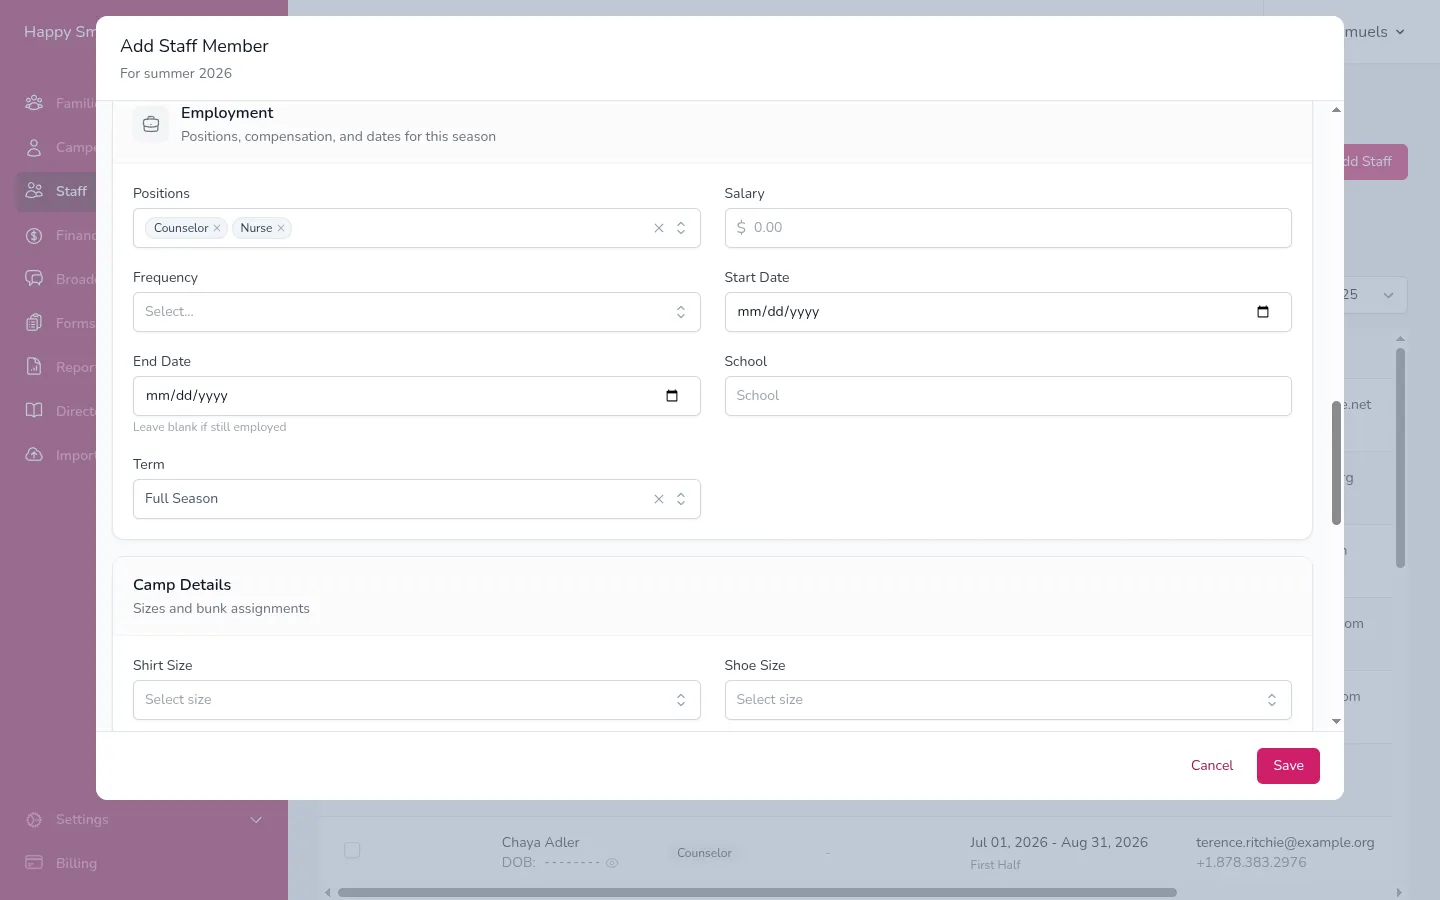
Employment
- Positions (required) — select one or more positions this person holds. Whether a position is returning or seasonal decides if they are carried into the next season.
- Term — appears when at least one position is seasonal. Choose whether they are working the First Half, Second Half, or Full Season.
- Start Date and End Date — the employment period.
- Salary — enter the amount and choose the frequency (hourly, daily, weekly, bi-weekly, semi-monthly, monthly, annually, or total for the season).
Health & Safety
- Allergies — note any allergies for the staff member
Emergency Contacts
- Two emergency contact slots with fields for name, relationship, phone numbers, email, and address
Bunk Assignments
- Select which bunks this staff member is assigned to for each half of the summer. For full-season or returning staff, you’ll see options for both first and second half.
Custom Fields
- If your camp has custom fields configured for staff, they’ll appear here. To create one, add a custom field in Settings and set its Field For to Staff.
- Click Save.
Importing Staff
Section titled “Importing Staff”If you have staff data in a spreadsheet — whether from another system, a previous season, or a list from your HR team — you can bulk-import it instead of adding staff one by one.
- Go to the Import page from the sidebar.
- Choose Staff.
- Follow the import wizard, which works in four or five steps:
Step 1: Upload
Section titled “Step 1: Upload”Drag your spreadsheet onto the upload area, or click to browse. Campflow accepts CSV, Excel (.xlsx, .xls), and LibreOffice (.ods) files up to 50MB, with a maximum of 5,000 rows. If your file has multiple sheets, select which ones to include.
Step 2: Map Columns
Section titled “Step 2: Map Columns”Campflow reads your column headers and automatically maps them to staff fields. You will see each column from your file, what Campflow thinks it matches to, and sample values so you can verify. To change a mapping, click the dropdown and search for the correct field.
Fields are organized into groups: Staff (name, email, phone, gender, school, notes), Contact Info (parent contacts, address), Employment (salary, dates, shirt/shoe size), Season (term, bunk), Identification (SSN, State ID), Emergency Contacts, and Custom Fields.
Required fields: You need at least First Name and Last Name mapped — or a Staff ID column if you are updating existing records.
Each field can only be mapped to one column. Unmapped columns are skipped during import.
Step 3: Clean Up (When Needed)
Section titled “Step 3: Clean Up (When Needed)”This step only appears if the wizard detects data that needs your input. Issues it can detect and help you fix:
- Full names in the First Name column — If “First Name” contains values like “Sarah Cohen” instead of “Sarah,” the wizard offers to split them into separate first and last name fields.
- Combined addresses — If the address column contains full addresses like “123 Main St, Brooklyn, NY 11201” without separate city, state, and ZIP columns, the wizard splits them into individual fields.
- New positions — If your file includes positions that do not exist in Campflow yet, they are listed here and will be created automatically during import.
- Unrecognized gender values — Values that do not match “Male” or “Female” are flagged for you to map to the correct option.
- Unrecognized term values — Values that do not match “First Half,” “Second Half,” or “Full Season” are flagged for resolution.
- Unrecognized salary frequencies — Values that do not match the available frequency options are flagged for mapping.
- Unrecognized custom field values — Any custom dropdown field values that do not match the configured options are flagged for resolution.
- School and city normalization — If the same school or city is spelled differently across rows, the wizard groups similar values and offers to standardize them.
Step 4: Review
Section titled “Step 4: Review”The review step shows exactly what will happen when you import. You will see a preview of the first 100 rows, each tagged as New staff (will be created) or Existing staff (matched to a record already in Campflow).
Campflow matches imported rows to existing staff using Staff ID, email address, or first and last name. For each row, you can choose Create, Update, or Skip using the dropdown in the Action column. Use the checkboxes at the top to bulk-create or bulk-skip all new or matched rows at once.
A cleaning summary at the top shows how many phone numbers, names, dates, and emails were automatically reformatted.
Step 5: Import
Section titled “Step 5: Import”Click Import [count] Staff Members to run the import. Staff are imported into the season you are currently viewing. When it finishes, you will see a summary showing how many staff members were created, updated, skipped, or failed. If any rows failed, the error details and a reference code are shown so you can troubleshoot.
Click View Staff to go to the staff table, or New Import to start another import.
The Staff Table
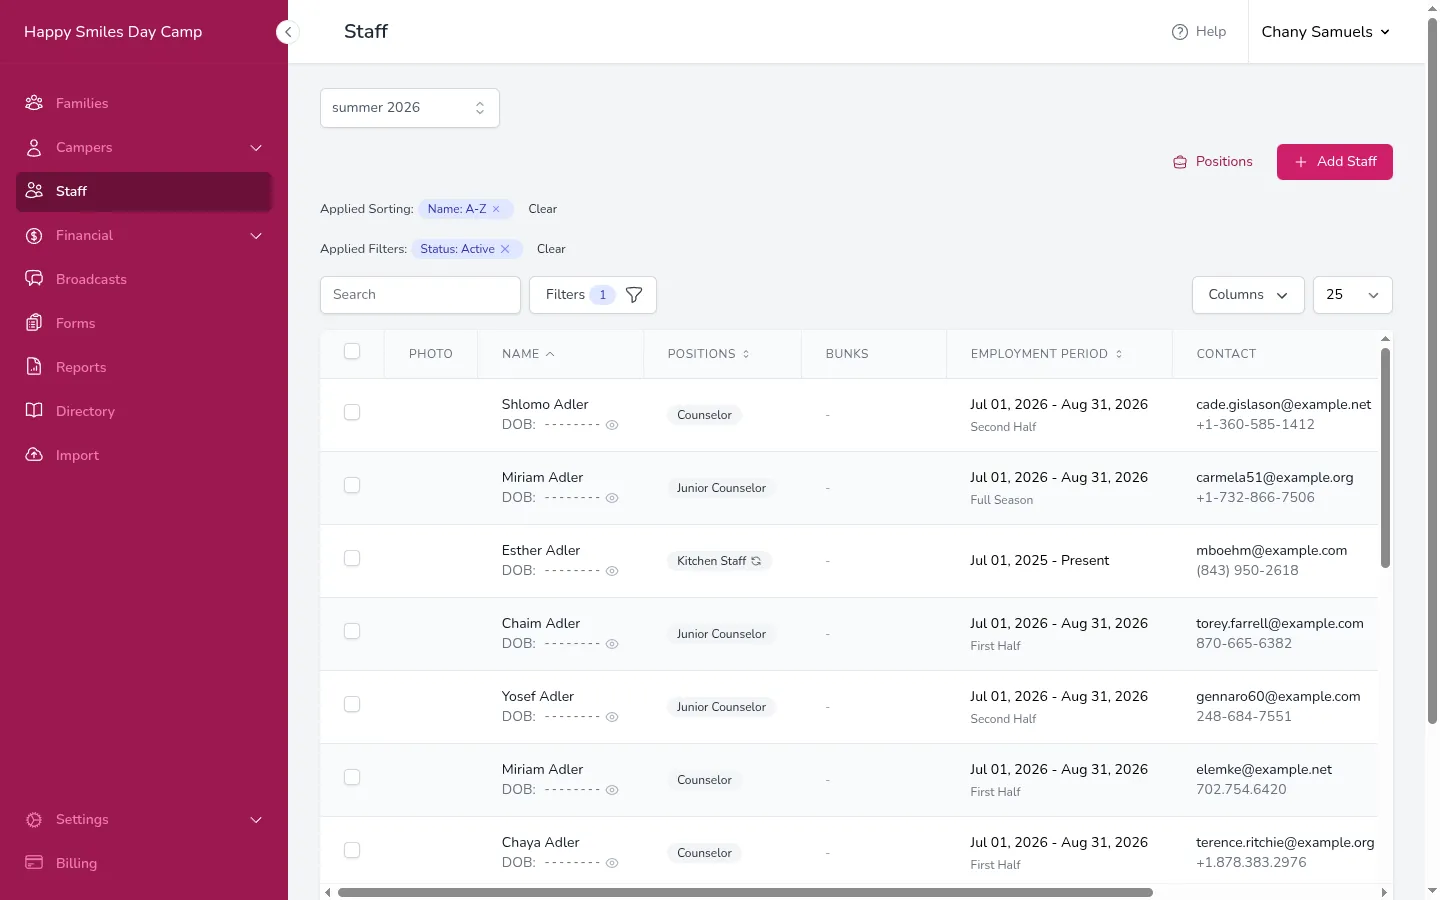
Section titled “The Staff Table”The staff table shows all your staff members with key information at a glance:
- Photo — profile photo thumbnail (click to enlarge)
- Name — full name with date of birth (hidden behind a privacy toggle)
- Positions — a badge for each position they hold this season. Returning positions show a small arrow icon to indicate they carry over between seasons.
- Bunks — color-coded badges showing which bunks the staff member is assigned to, with shading that indicates whether the assignment is for the first half, second half, or full season.
- Employment Period — start and end dates, with the term shown underneath for staff in a seasonal position
- Contact — email and phone number
You can show or hide additional columns by clicking the Columns button in the top right of the table. Available optional columns include Salary, Shirt Size, and any custom fields you’ve defined.
Searching and Filtering
Section titled “Searching and Filtering”- Search bar — type a name, email, phone number, or school to find a staff member.
- Filters — click Filters to open the filter panel, which lets you narrow the list by:
- Position — show only staff in a specific position (e.g., just counselors)
- Status — show active staff, inactive staff, or all
- Department — show staff assigned to bunks in a specific department
- Grade — show staff assigned to bunks with a specific grade
- Bunk — show staff assigned to a specific bunk
- Custom field filters (if any are defined)
Sorting
Section titled “Sorting”Click any column header to sort by that column. A small arrow next to the column name indicates the current sort direction. The default sort is by last name (A-Z).
Editing a Staff Member
Section titled “Editing a Staff Member”- Find the staff member in the table.
- Click the Edit button (pencil icon) in the Actions column on the right.
- Update any fields as needed.
- Click Save.
Activating and Deactivating Staff
Section titled “Activating and Deactivating Staff”Each staff member has an Active or Inactive status badge in the table. Click the badge to toggle between the two. Inactive staff members are hidden by default (the Status filter is set to “Active” by default) but their data is preserved and they can be reactivated at any time.
Deleting a Staff Member
Section titled “Deleting a Staff Member”- Click the Delete button (trash icon) in the Actions column.
- Confirm in the window that appears.
Deleting removes the staff member from the season you are viewing, along with their positions, pay, and bunk assignments for that season. Their personal details and any other seasons they worked stay as they are. If it is their only season, they are deleted completely, and this cannot be undone. The confirmation window tells you which will happen.
Bulk Actions
Section titled “Bulk Actions”Select multiple staff members using the checkboxes on the left side of the table, then use the bulk action menu to:
- Export — download an Excel spreadsheet with the selected staff members’ information
- Activate — set all selected staff to active status
- Deactivate — set all selected staff to inactive status
- Delete — remove all selected staff members from the season you are viewing. Anyone with no other season is deleted completely. You will be asked to confirm first.
Returning vs. Seasonal Staff
Section titled “Returning vs. Seasonal Staff”The staff table shows the staff working in the season you are viewing. A staff member’s positions, term, salary, and bunks belong to each season, while their personal and contact details stay the same across seasons.
- Returning staff (in a position marked “Returning”) are carried into each new season automatically when it is created, with the same positions, salary, and term. Inactive staff are not carried over. These are your year-round employees like administrators, nurses, and maintenance staff.
- Seasonal staff (in a position marked “Seasonal”) only appear in the seasons they were added to. To bring back staff from a previous season, import them while viewing the new season. Campflow matches them to their existing record and adds them to the season. Adding them again with Add Staff creates a second record for the same person.
Good to Know
Section titled “Good to Know”- The Staff page is separate from the Users page in Settings. Staff members are the people who work at your camp; users are the people who log in to Campflow. A person can be both.
- Salary information and legal identification fields (SSN, State ID) are treated with extra privacy. They don’t appear in the default table view and are hidden behind reveal toggles in the edit form.
- Staff bunk assignments show up on the Bunks page too — you’ll see counselor initials in each bunk column header.
- When exporting staff data, the file includes all visible information. Be mindful of who you share it with, as it may contain sensitive personal data.
- You can re-import a corrected file at any time. Campflow matches rows to existing staff using Staff ID, email, or name. Matched records can be updated or skipped — you choose for each one in the review step. Only non-empty cells in your file will overwrite existing data, so blank cells will not erase information that is already there.
- If your file includes positions that do not exist in Campflow, the import creates them automatically as seasonal (non-returning) positions. You can change this in Staff Positions after importing.
- When an imported row matches an existing staff member who holds a different position, the imported position is added alongside their current one.
- Bunk names in the import are matched against existing bunks in the current season. If a bunk name does not exist, it is created automatically.