
The Camper Table
The camper table shows every individual camper enrolled in the current season. While the family table is organized by family, the camper table is organized by camper — one row per camper — making it useful for tasks like checking bunk assignments, reviewing grades, or finding campers with specific allergies.
Getting There
Section titled “Getting There”- Click Campers in the sidebar.
- Click List (this is the default sub-page).
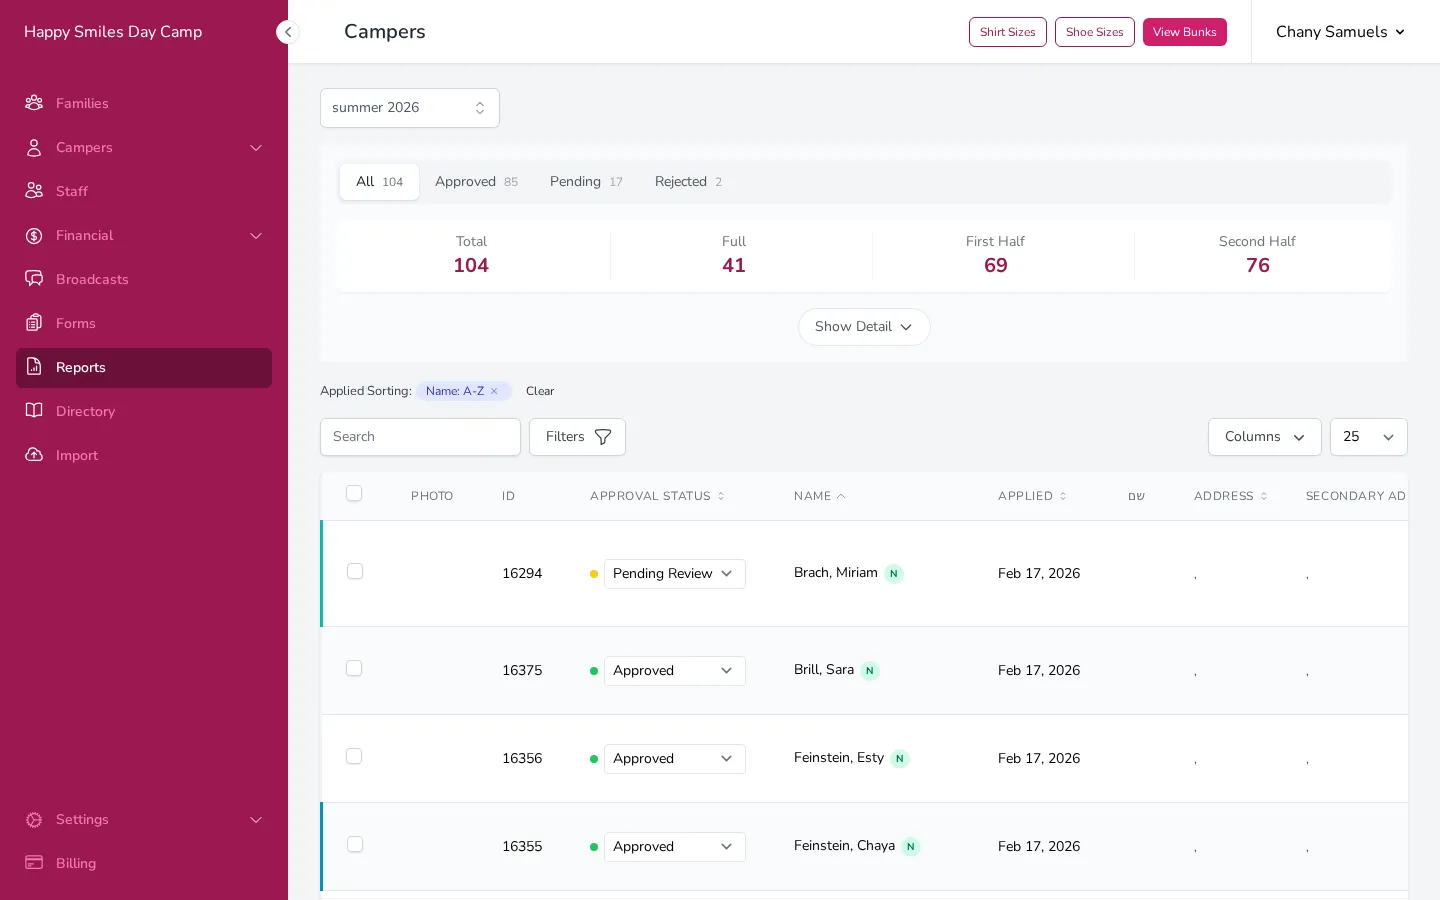
Camper Counts
Section titled “Camper Counts”Above the table, a row of tiles summarizes how many campers you have, broken down by term. This gives you an at-a-glance headcount without scrolling through the table.

- Total — Every camper in the current season, counted once.
- Full — Campers enrolled for the full season.
- First Half — Campers there for the first half. This also counts full-season campers, who attend both halves, and custom-date campers whose dates fall within the first half.
- Second Half — Campers there for the second half, counted the same way as First Half.
- Custom — Campers with a custom date range that does not match a standard term.
When custom-date campers are counted toward a half, the tile shows a small “incl. N custom” note, so you can see how many of that half’s campers have custom dates.
Because full-season campers and overlapping custom campers are counted toward each half they attend, the First Half and Second Half tiles can add up to more than the Total. The Total always counts each camper once.
Filtering the Counts by Status
Section titled “Filtering the Counts by Status”A switcher above the tiles lets you choose which campers the counts include:
- Active — Approved and pending campers (everyone except rejected). This is the default.
- Approved, Pending, Rejected — Only campers with that status. Rejected appears only when your season has rejected campers.
- All — Every camper, regardless of status.
Choosing a segment also filters the table below to match.
Changing How Much Detail You See
Section titled “Changing How Much Detail You See”A Hidden / Summary / Detail switcher on the right controls how much of the count area is shown. It defaults to Summary.
- Summary — Shows the term totals row (Total, Full, First Half, Second Half, and so on) above the table.
- Detail — Adds a per-grade breakdown below the totals. Each grade card shows its own term totals, and hovering a half reveals how the number splits — for example, how many are first-half campers versus full-season or custom campers counted toward that half. Each grade’s Total counts every camper in that grade once.
- Hidden — Collapses the count area entirely, giving you more room for the table.
Your choice is remembered between visits.
Searching
Section titled “Searching”Type into the search bar to find campers by first name, last name, address, or other details. The search works across most visible columns.
Columns
Section titled “Columns”The table includes the following columns. You can show or hide columns by clicking the Columns button above the table. To rearrange columns, drag them into your preferred order using the grip handle next to each column name in the dropdown. You can also resize any column by dragging its right edge in the table header.
- Photo — The camper’s profile photo (if your camp uses profile photos).
- ID — The camper’s internal ID number.
- Approval Status — The camper’s current enrollment status (e.g., Approved, Pending, Waitlisted). You can change the status directly from this column using the dropdown — see Approval Workflow.
- Name — The camper’s full name (last name, first name) with a Returning (R) or New (N) badge. Click the name to go to the family’s detail page.
- Applied — The date the camper’s enrollment was created.
- Hebrew Name — The camper’s Hebrew name (if your camp uses Hebrew name features).
- Address — The family’s home address.
- Secondary Address — The family’s secondary address, if applicable.
- Colony — The family’s colony and unit number.
- Date of Birth — The camper’s birthday and current age.
- Term — The enrollment term (Full Season, First Half, Second Half, or Custom with date range).
- Grade — The camper’s grade. If you have edit permissions, this appears as a dropdown you can change directly from the table.
- Bunk — The camper’s bunk assignment. Like grade, this appears as a dropdown you can change directly.
- Yeshiva/School — The camper’s school.
- Rebbe/Teacher — Up to two teachers with phone numbers.
- Doctor — The camper’s doctor with phone number.
- Allergies — The camper’s allergies.
- Shirt Size and Shoe Size — The camper’s sizes.
- Gender — If your camp is co-ed.
- Optional Fees — One column per optional fee, showing the fee amount if the camper is enrolled or “N/A” if not.
- Custom Fields — Any custom fields your camp has configured for campers or enrollments. Family custom fields are available too, marked “(Family)” — these columns are hidden by default, so turn them on from the Columns button when you need them. Family values are shared by every camper in the family and can be edited from the family table.
- Balance — The family’s financial summary (charges, payments, pending, and total balance).
- Notes — Notes from the camper record (if your camp uses the camper Notes field).
Sorting
Section titled “Sorting”Click any column header to sort. You can sort by name, grade, bunk, date of birth, term, applied date, balance, and most other columns.
Filtering
Section titled “Filtering”Click the Filters button to open the filter panel. Available filters include:
- Allergy Status — Show campers with or without allergies.
- Approval Status — Filter by specific approval statuses (e.g., Approved, Pending, Waitlisted).
- Camper Type — Show Returning campers (those enrolled in a previous season), New campers, or Any.
- Term — Filter by enrollment term. You can select broad categories like “First Half Period (incl. Full)” to include campers who are there for first half AND full season, or narrow ones like “First Half Only” for just first-half campers.
- Who’s here on — Pick a single date to show only the campers who are expected to be at camp that day — full-season campers, the campers in the matching half, and any custom-date campers whose dates cover that day. This is a scheduling view of who is expected to attend, not a check-in. (This filter and the Term filter are mutually exclusive — choosing a date clears the term.)
- Grade — Filter by one or more grades.
- Yeshiva/School — Filter by school. You can combine this with the Grade filter to narrow results further. For example, filter by “5th Grade” and “Yeshiva of Brooklyn” to see exactly which campers from that school are in that grade.
- Rebbe/Teacher — Filter by teacher name.
- Bunk — Filter by bunk assignment (or campers with no bunk).
- City, State, Secondary City, Secondary State — Filter by location.
- Colony — Filter by the family’s colony. Useful for lists that split campers by where they stay, like bus lists for on-grounds vs. off-grounds campers. (This filter appears only if your camp uses the colony field.)
- Balance — Filter by the family’s financial standing. You can select one or more of:
- Has a balance due — The family owes money right now.
- Has a balance after expected payments — The family still owes money even after their expected payments (pending payments and upcoming Autopay charges) are applied. Use this to see who still needs attention.
- Balance covered by expected payments — The family has a balance, but their expected payments will cover it.
- Has a credit — The family has paid more than they owe.
- No balance — The family is paid up.
- Missing Documents — Show campers that are missing specific registration documents. Select one or more documents to see every camper missing any of them. For family-level documents, a camper appears if their family has not submitted the document. (This filter appears only when your season has documents that parents need to submit.)
- Custom Fields — Each custom field with data becomes a filter option. This includes family custom fields, marked “(Family)” — for example, filter campers by their family’s bus or van assignment.
- Fees — Each fee your camp has set up gets its own filter. Select Has [fee name] to show only campers charged for that fee, or No [fee name] to show campers without it. For example, if you have a “T-Shirt Package” fee, filter to “Has T-Shirt Package” to see exactly which campers have it.
Changing Grades and Bunks Inline
Section titled “Changing Grades and Bunks Inline”If you have the right permissions, you can change a camper’s grade or bunk directly from the table without opening the family detail page. Just select a new value from the dropdown in the Grade or Bunk column. The change saves immediately.
If a camper’s bunk doesn’t match their grade (for example, they’re in Grade 4 but assigned to a Grade 5 bunk), a small warning icon will appear next to the bunk name.
Bulk Actions
Section titled “Bulk Actions”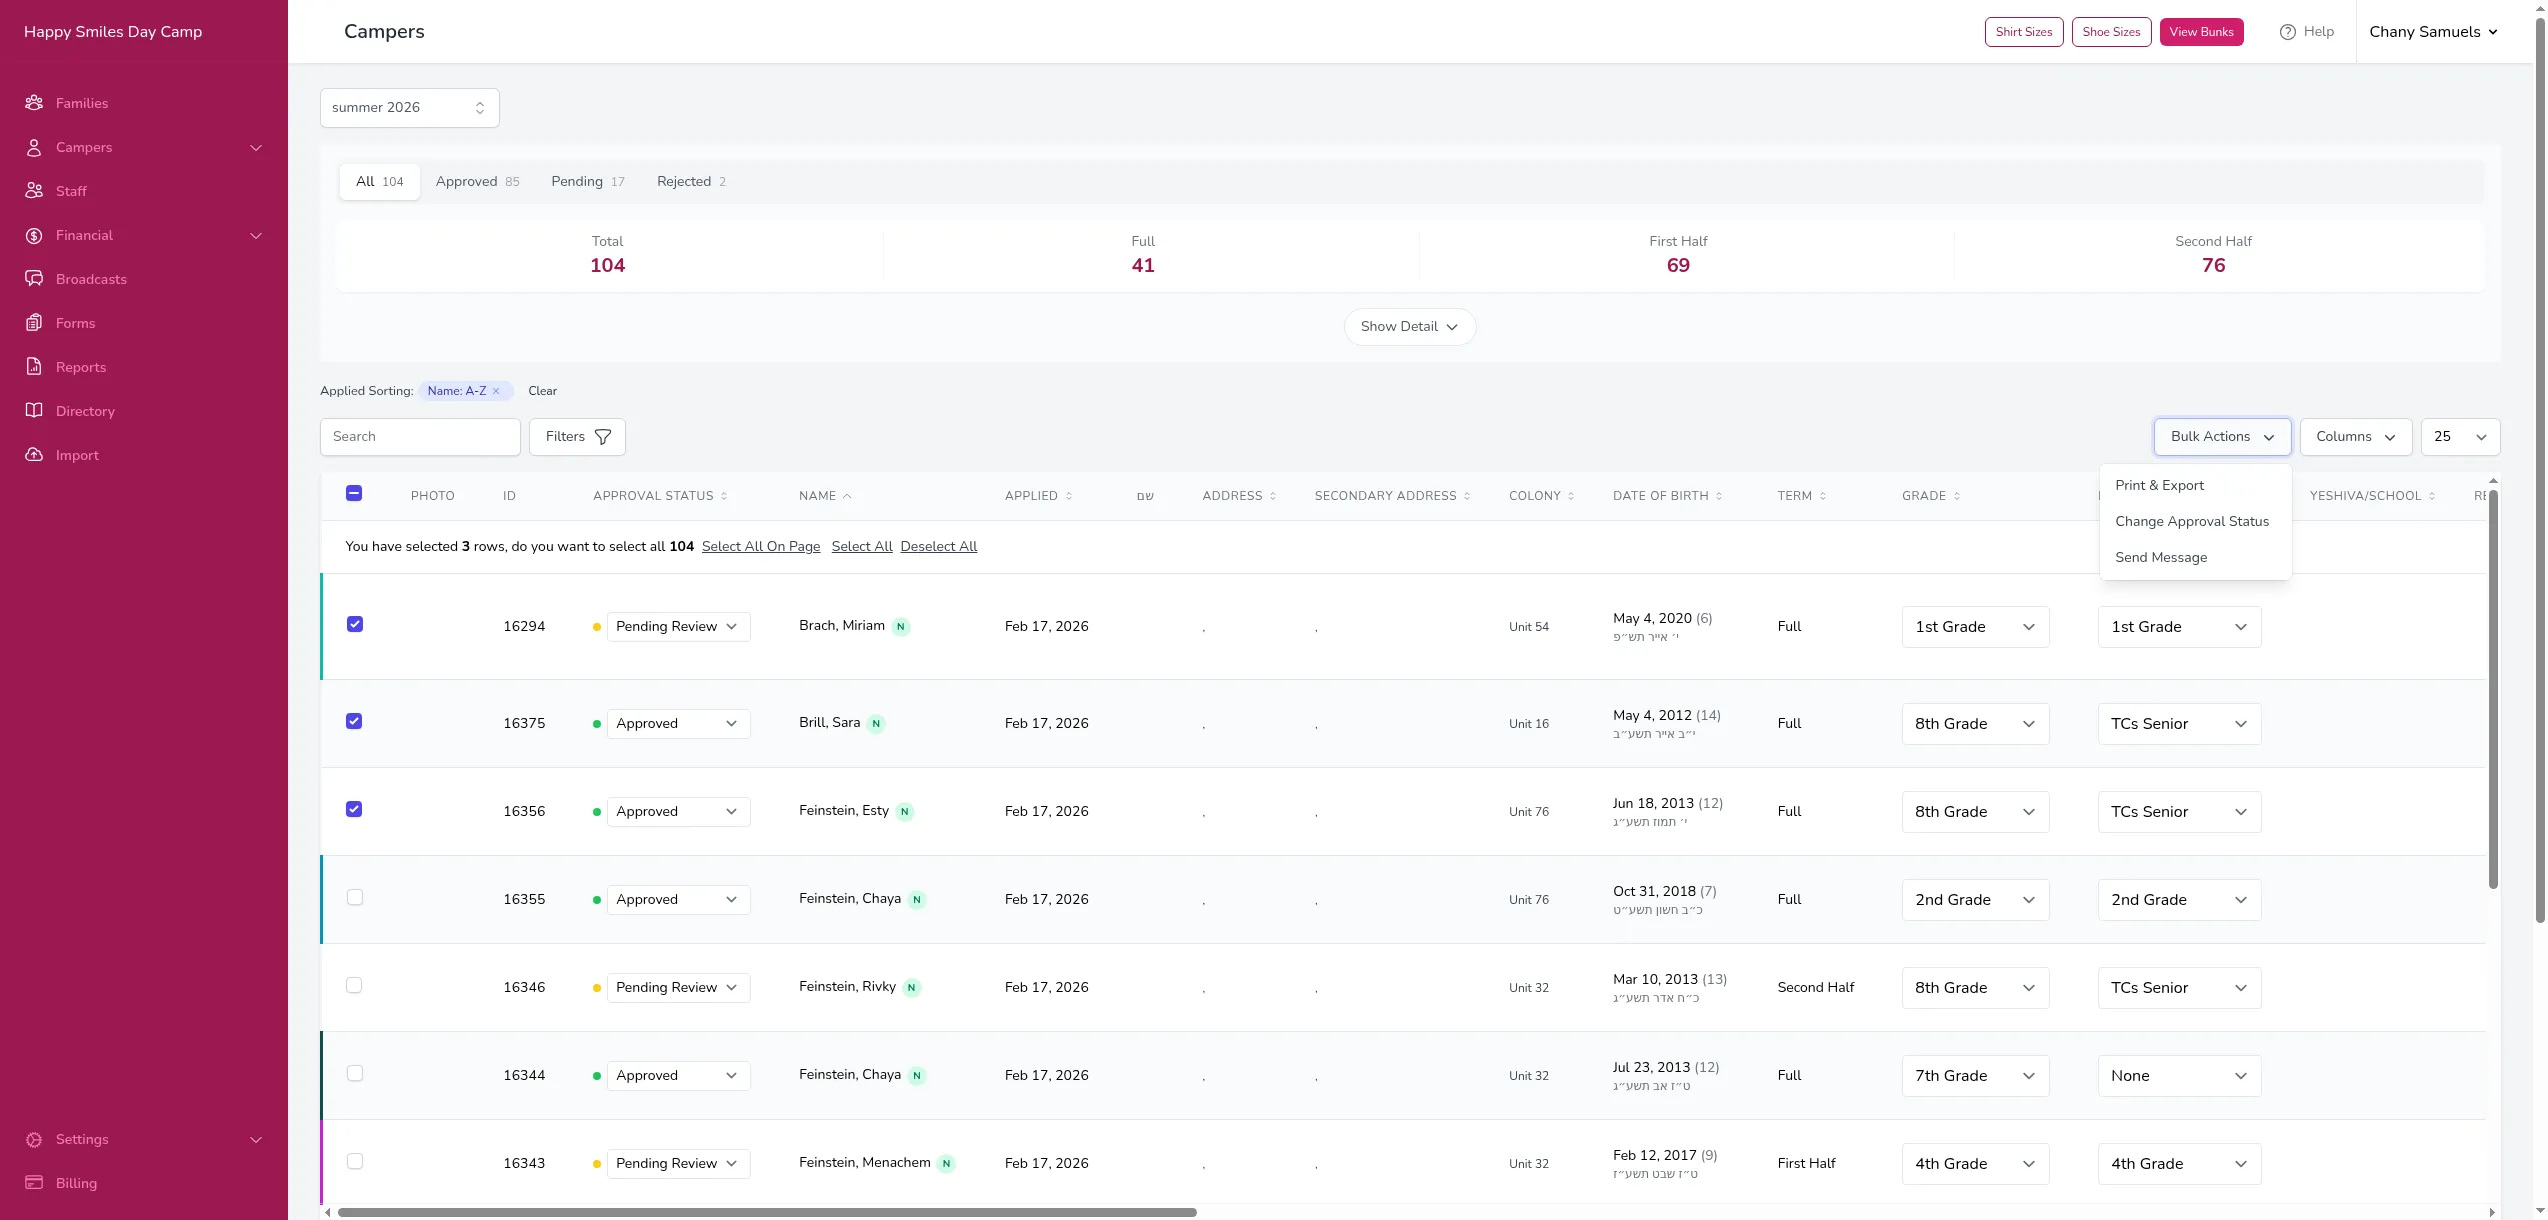
Select campers using the checkboxes on the left side of the table. To select all campers in your current view, click the Select All checkbox in the table header. If you have filters applied, only the filtered campers are selected — this is a quick way to print or export a specific subset (for example, all campers in a particular grade or with a specific approval status). Once selected, choose an action:
- Print & Export — Opens the Print & Export panel for the selected campers, where you can choose a format (contact list, labels, admission cards, or Excel), pick the fields to include, and generate the output.
- Change Approval Status — Change the approval status for all selected campers at once. See Approval Workflow for details.
- Send Message — Create a broadcast targeted to the families of the selected campers.
Good to Know
Section titled “Good to Know”- The camper table only shows campers enrolled in the current season. If the table is empty, it means no families have registered campers for this season yet.
- Clicking a camper’s name takes you to their family’s detail page, not a separate camper page. Campers are always managed in the context of their family.
- Changes to grades and bunks made directly in the table take effect immediately — you don’t need to click a separate save button.