
First Steps
This is a recommended checklist for getting your camp set up in Campflow. You don’t have to do everything at once, but working through these steps in order will get you up and running smoothly.
The Get Set Up Guide
Section titled “The Get Set Up Guide”When you first log in, the Families page shows a Get set up checklist with the most important steps — bringing in your families, adding your logo and color, previewing your registration form, getting your camp’s own phone number, setting your season prices, applying for online payments, and sending registration to parents. Steps check themselves off as you complete them, in any order. The same checklist is available from the Getting Started item at the top of the sidebar.
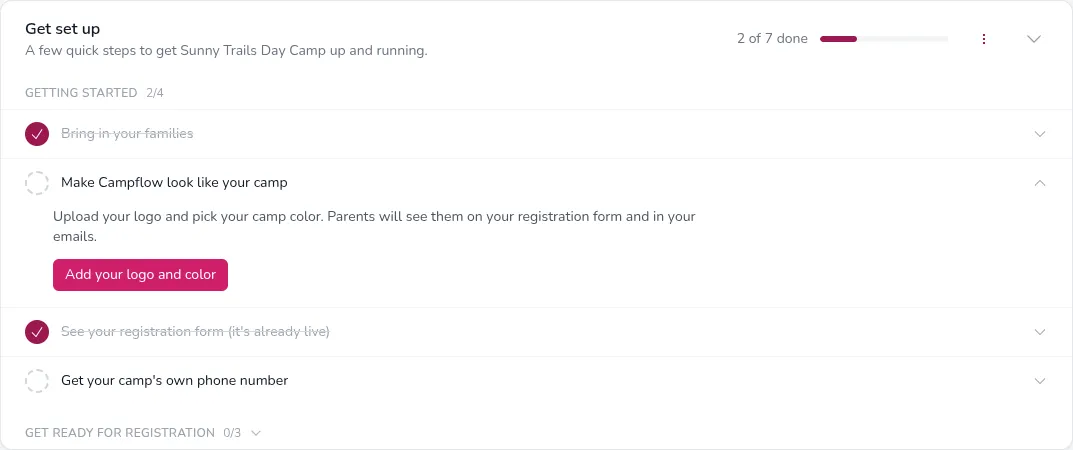
Your camp starts with no families. If you want data to explore before importing your real list, the first step of the guide has an Add 5 sample families to explore button. Sample families are marked with a “[sample]” prefix and don’t count as real data. To remove them, open the ⋯ menu on the guide and choose Remove sample data.
If you’d rather work without the guide, choose Hide guide from the same ⋯ menu. This hides it permanently for everyone at your camp — your data and settings are not affected.
The checklist below covers the same ground in more detail, plus a few steps the guide doesn’t include.
1. Fill In Your Camp Profile
Section titled “1. Fill In Your Camp Profile”Start by going to Settings > General in the sidebar. This is where you enter your camp’s basic information:
- Camp name, phone number, and email — This appears on registration forms, statements, and parent-facing pages.
- Camp address and mailing address — Used for statements and correspondence.
- Camp gender — Whether your camp is for boys, girls, or co-ed.
- Main color — The accent color used on your registration forms and parent-facing pages.
- Camp logo — Displayed on registration form headers. Square images work best.
You’ll also see your own personal info at the top of this page (your name, email, and phone number). Make sure that’s up to date too. This email address is also your login. If you change it here, your login email changes too.
For more details, see Camp Profile & Branding.
2. Configure Your Season
Section titled “2. Configure Your Season”Every piece of data in Campflow — campers, enrollments, payments, grades — belongs to a season. You’ll see a season picker at the top of every page. Your first season is created when you sign up, but you’ll want to configure it properly.
On the Settings > General page, scroll down to the Camp Season section to set:
- Season name — For example, “Summer 2026.”
- Season dates — The start date, first half end, second half start, and end date. These control how terms (full season, first half, second half) are calculated.
- Default pricing — The base tuition for a full season, per month, per week, and per day.
To learn more about season configuration, see Creating a Season.
3. Set Up Departments & Grades
Section titled “3. Set Up Departments & Grades”Still on the Settings > General page, scroll further to the Departments & Grades section. This is where you define the age groups for your camp.
- Departments are top-level groupings (like “Elementary” and “High School”).
- Grades are the age groups within each department (like “3rd Grade” or “Bunk Aleph”).
You can drag to reorder them and assign colors for easy identification. You’ll need at least one department and one grade before you can enroll campers.
For details, see Departments & Grades.
4. Add Approval Statuses
Section titled “4. Add Approval Statuses”Approval statuses let you track where each camper is in your enrollment process — for example, “Approved,” “Pending,” or “Waitlisted.” You define the statuses that make sense for your camp.
Set these up in Settings > General under the Approval Statuses section.
See Approval Statuses for details.
5. Add Your Families
Section titled “5. Add Your Families”Once your season and grades are set up, you can start adding families. There are a few ways to do this:
- Manually — Go to the Families page and click New family in the top right. See Adding a Family.
- Import from a spreadsheet — If you have existing data, go to the Import page in the sidebar to bring it in.
- Registration — When parents register online, their families are created automatically.
6. Set Up Registration (When You’re Ready)
Section titled “6. Set Up Registration (When You’re Ready)”If you want parents to register online, go to Settings > Registration to configure your registration form. This includes choosing which fields to show, what documents to collect, setting registration dates, and configuring payment options.
See Setting Up Registration for the full guide.
7. Apply for Payment Processing
Section titled “7. Apply for Payment Processing”If you plan to accept credit card or ACH payments, you’ll need to apply for payment processing. On the Settings > General page, under Accepted Payment Methods, expand More options on the card or ACH method and click Ask us to set up online payments. Campflow will email you a short application from the payments partner, and once you’re approved, the Campflow team finishes the setup for you. Approval usually takes one to two business days, so it’s a good idea to get this started early.
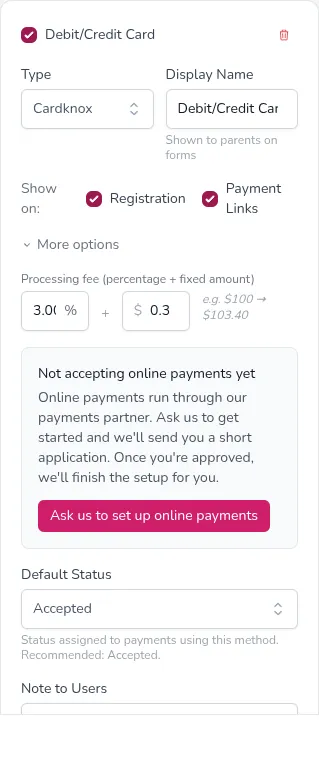
Parents can pay by cash, check, or Zelle without any of this — payment processing is only needed for online card and bank payments.
8. Set Up SMS Brand Verification
Section titled “8. Set Up SMS Brand Verification”If you plan to send text messages to families, you’ll also want to start the SMS brand verification process as soon as possible — it can take a week or more to get approved. This is a regulatory requirement handled by a third party, not something we control. See Setting Up SMS for how to get started.
9. Invite Your Team
Section titled “9. Invite Your Team”If other people at your camp need access, go to Settings > Users to add them. You can control exactly what each person can see and do with roles and permissions.
See Managing Users for details.
Good to Know
Section titled “Good to Know”- You can always come back and adjust settings later. Nothing here is permanent.
- If you’re moving from another system, the Import page can save you hours of manual data entry.
- The season picker at the top of every page controls which season’s data you’re looking at. If something looks wrong, check that you’re viewing the right season. If things still seem off, try reloading the page. See Switching Seasons for more.